![]()
PiTiVi is a GTK-based film editor that shows promise but lacks enough refinement to be much more than a “lite” version of other film packages. Its interface is simple enough to use as it was designed, with both newbie and seasoned film fanciers in mind.
PiTiVi was created in 2004 by a team of student developers. Recent versions are rewritten in Python and wrap around the GStreamer Multimedia Framework. The latest version, 0.14.0, was released in June 2011. It solves a bevy of missteps but still has room for improvement.
PiTiVi’s overall simplicity earns it kudos for usability. Still, this app is not yet a perfect replacement for some of the more more established film editing alternatives. These include AvideMUX, Cinepaint, Kino, Viva and FFmpeg. But its new-kid-on-the-block status does not mean that PiTiVi is a poor choice for film editing.
Instead, the application’s motto of “anything in/anything out” is a good clue to the degree of flexibility this film editor provides. If the file format is supported by the GStreamer Multimedia Framework, PiTiVi can import and export any film format you have. Learning to use its feature set is easy. The Framework manipulates importing and and runs the multimedia functions.
Good GUI
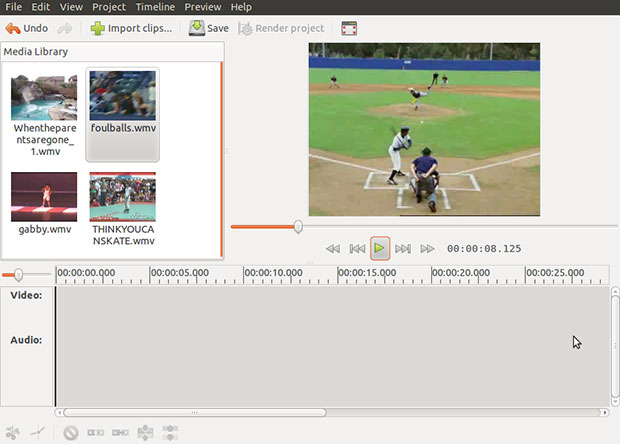
The Graphical User Interface (GUI) is one of the design tricks that makes PiTiVi work so well. You can import video clips to PiTiVi’s Media Library by clicking the Import button and selecting the file or files to import. Complete the import by clicking on the Add button in the file selector window that appears. A faster method is to drag the file directly into the media library box.
The video files display by file name or thumbnail in the media library window on the top left portion of the application’s display. The right click button on the mouse also accesses the import file command as well as the Remove Clip command.
The running view of the clip plays in the viewer space on the upper right portion of the application window. To start the process, right click on the thumbnail or the file name in the media library. Basic control buttons under the running clip are forward/reverse and start/stop/pause the playback. A digital running time readout is to the right of these buttons.
The entire bottom portion of the application window shows a time line with the video and audio segments of the running clip. They display as a series of still previews. To do any editing, drag the video clip from the media library into the editing workspace below the time line. This also loads the clip into the viewing window.
Easy Startup
PiTiVi does not require much in the way of setup decisions. The preferences are divided between the Appearance and the Behavior panels.
The only choice for the Behavior is setting the snap distance in pixels. The options for appearance resemble settings for a text editor. You can set the clip audio and video background colors, the clip font and the selection color.
The only other appearance choices are showing or hiding video thumbnails and audio waveforms. You can also set the thumbnail gap in pixels.
Using It
PiTiVi is surprisingly intuitive to use. By default, the app separates the video and audio channels into separate displays under the timeline. This makes it handy to edit each element individually. But the app also by default moves or deletes linked audio and video tracks so the editing process is unified when you want it to be.
You can do simple cut and paste operations very easily using the tool bar buttons at the bottom of the application window. You can also render video in many formats with minimal effort. This again is where the well-designed GUI kicks in.
Two small buttons cut clips into editable segments. You can delete them as well as detach an audio clip from video or attach a new audio clip to the video. To arrange clips just click and drag a video segment to a new location. Other editing choices are buttons for group/ungroup clips, linking arbitrary clips together and breaking linked clips.
Once you drag a clip next to another segment, they are linked or stuck together. Use the small slider bar on the left side of the time line to stretch or shrink it. This process lets you view finer segments or pull back for a bigger view.
Project Settings
One of the most detailed settings options is found in the Project Settings menu. This opens a panel that lists video and audio export choices and export requirements. It is really a neat approach to cataloging information about the film project you create. For example, you can enter the project (file) name and provide a detailed description of the contents.
The video output options are in a scrollable list that includes formats for PAL DV/DVD, NTSC, 720p HD, 1080p full HD, QVGA, VGA, SVGA, XGA and custom Making — that last choice lets you specify width, height and frame rate.
The Audio output choices are less more limited. You can select CD or custom. The custom choice opens options to select two-channel stereo or mono sound track. You can also select from among six frequency rates. Four sound depth options available are 8 bit, 16 bit, 24 bit and 32 bit.
Export container options include more than two dozen formats.These include Ogg Muxer, ASF Muxer, MJ2 Muxer, 3GPP Muxer and a long list of FFmpeg varieties. The audio codec is automatically selected based on the container format choice you make. Video codec selection offers choices only when the selected container offers them.
Bottom Line
PiTiVi is a good starting point for video editing. Its intuitive design gets you working quickly. Its included tool set is fine for light-to-moderate skill levels. But what it does not include makes it too limiting for more advanced skill levels.
I would think twice about using this application for professional-strength editing. But if the film tasks are within its boundaries, PiTiVi can be a very workable tool for editing and creating film projects.


