When I went into writing this article, I thought I knew the route to the destination I intended to lead you to. But in retracing my steps to make sure I understood the way, I ended up way off course. Irked as I was at this gap in my knowledge, the exercise allowed me to produce the kind of piece I enjoy writing the most: one where I learn as much as you do, if not more.
Given how widely the subject of this article varies between Linux distributions — and has varied over time — I shouldn’t have been surprised I took a wrong turn. With computers, knowledge goes stale — and fast.
Ah, where are my manners? Our topic today is configuring desktop Linux DNS settings. It’s simple in principle and can yield privacy, security, and availability benefits. Yet despite how straightforward it is in theory and historically was in practice, customizing your device’s DNS is no longer an intuitive matter.
Master of Your Computer’s Domains
Why fuss over DNS in the first place? Because DNS configuration is low-hanging fruit for clawing back some agency over your digital life. To understand why, here is a brief overview of DNS.
The “Domain Name System” is commonly described as the “phone book” of the internet. Any internet connection, i.e., Internet Protocol, only understands IP addresses, not domain names, like linuxinsider.com. When you enter a URL containing a domain, your computer asks a DNS server for the IP address associated with the domain. Once the DNS server responds with the answer, your computer dials up that IP address and connects.
You might have noticed a chicken and egg scenario here. If your computer needs an answer from a DNS server before it can connect, then how does it find the DNS server? Your computer stores a few DNS server IPs so it knows whom to ask about domains.
So, where do these DNS server IPs come from? There are a few possibilities, but typically, they come from the network you’re connected to.
An access point (AP) administrator can customize these or, as is more common on home or small business networks, IPs can be automatically set by the internet service provider (ISP) linking the AP to the internet. ISP-provided DNS servers often belong to the ISP. Regardless of who ultimately sets the AP’s DNS servers, the AP pushes their addresses to client devices.
Alright, to pick up from before this detour, why might you want different DNS servers than the ones the AP feeds your computer?
First, the AP might use DNS to block you from certain domains. One of the simplest ways to steer devices away from a site is not to provide the “correct” answer to DNS requests for it. You can evade this rudimentary censorship by picking a DNS server that you know will answer your queries honestly.
Second, you may still wish to use the internet if your ISP’s DNS ever crashes. A few years ago, a DDoS attack against DNS provider Dyn effectively prevented millions of users from using the internet.
Was the internet down? Oh, not at all. Users’ devices simply couldn’t reach the Dyn DNS servers their ISP handed them. Anyone who custom-configured their devices to go directly to alternative DNS servers could keep surfing like nothing happened.
There’s a Reason Why Keeping Your Resolutions Is So Difficult
Despite my appreciation of DNS, it’s one of those things I never remember exactly how to configure. Part of why I wanted to write this article was to make it stick. I doubt I’ll forget it now.
In the Linux days of yore, DNS configuration was easy. When your device received DNS server addresses from the AP, the system wrote them directly to /etc/resolv.conf. Just disable the service that overwrote that file — for desktop Linux, usually NetworkManager — write in whatever DNS servers you want, and you are good to go.
Systemd has made DNS customization (and many other things) complicated. We’ll stick to the barest essentials. A sprawling piece of software, systemd is simultaneously an init system and daemon control application. However, we’re only concerned with daemons, which are just background services.
One of these daemons, systemd-resolved, handles DNS. Different Linux desktop distros interact with systemd-resolved in their own ways, so it’s difficult to describe the DNS resolution process in all cases. But systemd-resolved is the reason why we can’t just overwrite /etc/resolv.conf. The service runs a “stub listener” on your computer on IP address 127.0.0.53 (all 127.0.0.x IP addresses are reserved for a device to refer to itself).
The stub listener is a “DNS server” that only a) forwards requests to real DNS servers and b) caches their returned responses. To ensure it receives all your system’s DNS requests, systemd-resolved controls /etc/resolv.conf, forcing it to contain only the stub listener.
This isn’t the only way systemd-resolved catches all your computer’s DNS requests; it’s just the last resort. But since all of systemd-resolved’s man pages warn you not to disable it, we have to go through systemd-resolved to configure our DNS.
Let’s Make Our Query and Split!
I understood that much going in. But while the foregoing explanation isn’t incorrect, it is incomplete. Naively, I believed tweaking systemd-resolved was as simple as sticking my desired servers in its configuration file: /etc/systemd/resolved.conf. What I failed to understand was systemd-resolved’s “split DNS” architecture.
Under systemd-resolved, each individual network interface (e.g., wireless card, Ethernet adapter, etc.) or “link” has its own link-specific DNS settings. The rationale behind this is sensible: You may want to resolve DNS queries using different servers in different cases. This blog post on the Gnome Foundation website provides a digestible overview of split DNS’s functionality, offering accessible examples of when per-link DNS configurations would be desirable.
The critical takeaway from the article is that to fully control where our DNS queries on desktop Linux go, we have to:
- Configure the DNS servers that a specific link or the global should forward to, and
- Specify the conditions on which systemd-resolved should forward to that link or global.
There are multiple methods by which systemd-resolved determines which link to route queries. This Fedora Magazine article was also indispensable in understanding how all these determinations work.
For our purposes, the salient detail is that by using the special “~.” route-only domain, we can tell systemd-resolved to default all queries to one link/global configuration unless the query fits another link’s more specific domain match.
The intricacies of what is and isn’t routed to this “default” DNS configuration are worthy of remarks. But this article has so much ground to cover that there’s little utility in making those remarks right now. Since I want to do my part to preserve all the knowledge I accumulated during this project, I will release a “Part 2” DNS exploration, picking up the pieces I’m momentarily dropping.
Finally Resolving the Matter
Instructive as they were, my one critique on the two articles cited above — and why I saw value in writing my own — is that neither goes into much detail on how to put the concepts they elucidate into practice. So, let’s address that.
We must first decide whether to set a singular link or the global DNS configuration as our default. If, like me, you just want your DNS resolution to be more resilient, the global configuration makes the most sense. This way, if we plug an Ethernet cable into our device, DNS queries will still go to our desired servers — but over the Ethernet cable.
If, instead, we set the wireless link as the default route-only domain, our computer would try to use the wireless card to resolve DNS even if then it would actually connect to the site via the Ethernet cable — or any other interface. This is even worse if our wireless card isn’t connected to a network, as the DNS queries would fail and get attempted on the other links, which we may not have customized.
Per-link settings have their place, that place being the follow-up to this article.
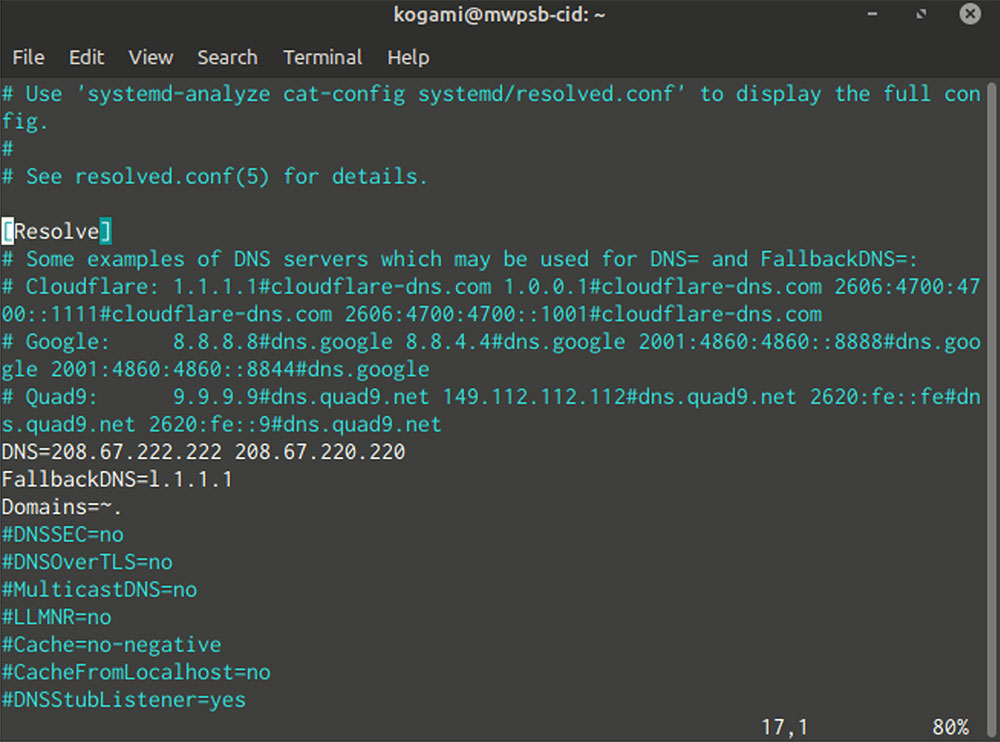
Selecting the global “link” for our DNS settings means we do only edit the /etc/systemd/resolved.conf (with superuser privileges), but with one key addition.
1. Uncomment the “DNS=” line and add up to three DNS IP addresses, separated by a space, after the “=”.
2. Uncomment the “Domains=” line and add “~.” (without quotes) immediately after the “=”.
3. Save the file.
4. Restart systemd-resolved by running systemctl restart systemd-resolved as superuser.

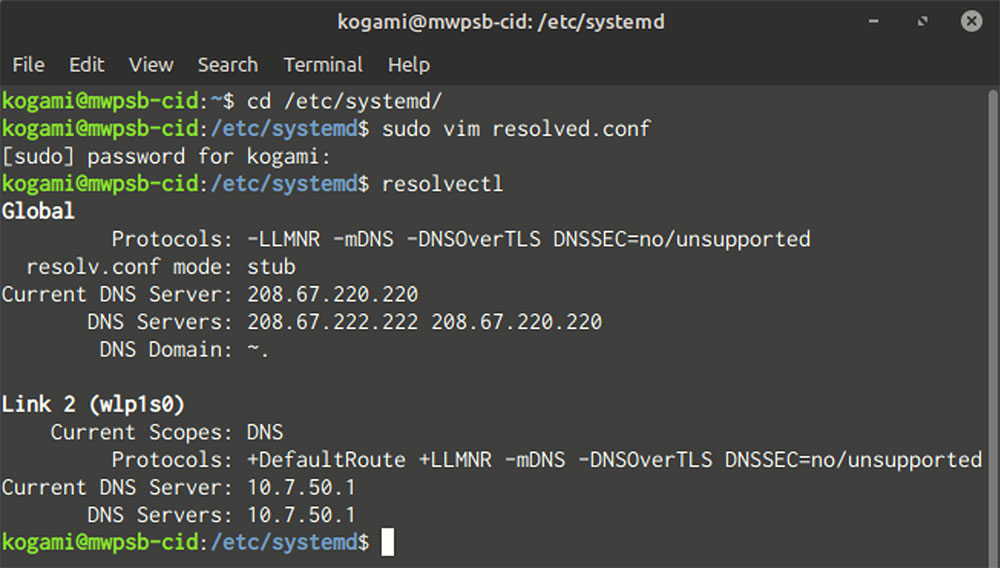
You can check your configuration by running resolvectl. In the output below your global configuration, you’ll see the DNS servers your AP pushed to your computer.

With split DNS, it’s important to audit the servers that actually fulfill your DNS requests.
1. Set resolvectl’s logging level to “debug” by running resolvectl log-level debug as superuser.
2. Flush the cache (to force fresh DNS queries) by running resolvectl flush-caches.
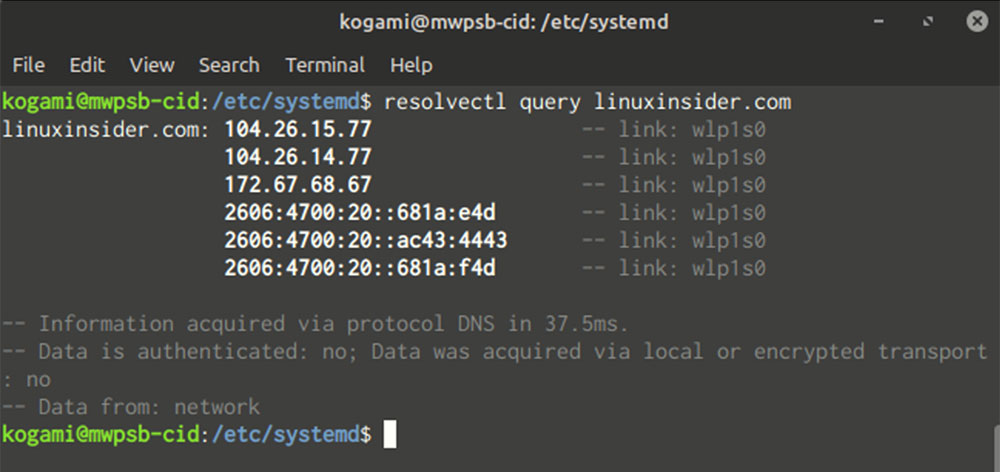
3. Do a DNS lookup via resolvectl query domain (where “domain” is any real domain).
4. Open the logs by running journalctl -u systemd-resolved.

When reading the logs, hit “/” to search, type “Using DNS server” (without quotes), and hit “Enter” (as the logs open in the “less” pager) to quickly locate where systemd-resolved forwarded the request.
If you only see the servers you set in your global configuration and none of the per-link servers from resolvectl’s output, then everything worked:

Stay tuned for my follow-up article, in which I will walk through systemd-resolved’s DNS routing process and cover per-link DNS configuration. Finally, I will debrief my exploratory mission and discuss why information on performing this theoretically basic task is deceptively hard to find.
Read the Next Installment: Crafting Advanced DNS Configurations on Linux
Suggest a Topic
Is there a tutorial you’d like to see featured?
Email your ideas to me, and I’ll consider them for a future column.
And use the Reader Comments feature below to provide your input!


