
![]()
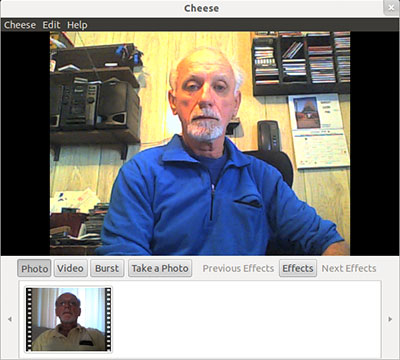
Cheese is a nifty little application that makes it easy to use your computer’s built-in — or plugged-in — webcam to take photos and videos. Given today’s penchant for populating social media with photo journals, Cheese can be one of your must-have Linux tools.
This handy webcam app brings to your portable and desktop computers the same degree of instant image tweaking that many smartphone and tablets currently offer. You can use its toolbox of features based on GStreamer to apply fancy special effects.
I initially discovered Cheese on my netbook. When I converted a laptop running Microsoft Windows over to the Linux OS, I installed Cheese to activate the portable’s webcam. I also dabbled with guvcview and wxcam but found Cheese to be easier and more reliable.
If you are familiar with the Mac OS, Cheese will fall quickly into your comfort zone. It is very similar to the Mac platform’s Photo Booth webcam app.
Say Cheese
The GUI in Cheese is one of this app’s finest assets. For first-time users it could not get any easier to use.
The app window opens with the webcam already activated. Not having to actually turn on the camera is a bonus. A large viewing window resizes as you drag the lower left corner of the display window across the computer screen.
A bare-bones menu row above the display window provides drop-down access to basic display window properties, edit and help functions. In what is a rarity for many open source apps, the help file is indexed and provides all the basics for using the program. But I have yet needed to read through this help file.
A thumbnail view of photos or movie frames taken fills the space below the live webcam view.
Easy Cheesey
A button row below the webcam viewing window provides one-click access to the webcam actions. For instance, there is Photo, Video and Burst. Depending on which action you select, other buttons appear.
For instance, clicking the Photo button adds a Take a Photo button and an Effects button. Clicking the Video button shows the Record a Video button. The Effects button remains. Clicking either action button activates the photo or video capture session. You can also use the keyboard shortcuts instead of clicking.
My favorite action button is the Burst feature. This displays a Take Multiple Photos action button next to the Effects button. It’s perfect as an in-between capture when I don’t want to consume huge video footage but still want to show a semblance of activity in motion.
The Setup
The default webcam settings may not need any tinkering. But one of the first things you should do is go to the Edit/Preferences menu.
This panel lets you select multiple video and cam devices. You can also set the preferred photo and video resolutions along with the image properties. These include brightness, contrast, saturation and hue.
The preferences panel also gives you several check boxes to turn off/on a few special effects. These are a countdown display that shows 3-2-1 in a pop-up window before the shudder activates and Fire Flash, which simulates a burst of light on the screen when the picture snaps. For Burst mode, you can set the number of photos in the burst action and the delay in seconds between photo capture.
Effective Effects
Cheese is loaded with some three dozen special effects. You can use them individually or combine them by clicking two or more.
Some of my favorite visual enhancements include: Mauve, Noir/Blanc, Vertical and Horizontal Flips, Dice and Warp. Twirl and Virtigo are really cool effects as well.
Some of the special effects work only with video capture. Others add animation to an otherwise still photo.
Some other webcam apps offer more editing features and special effects options. But Cheese is not intended for professional-strength use. Its toolbox of features and effects is hefty enough to serve hobby and social networking needs as well as professional tasks that do not require advanced editing.
Using It
Cheese is very simple to use with virtually no learning curve. Its core functions make it more than just a webcam activator.
For example, the lower portion of the Cheese window serves as a file manager. You can use it to display all the videos and photos you have taken.
I particularly like the ability to double click a photo to open it in the “Eye for Gnome” application. Similarly, double clicking on a video frame will automatically load the video player Totem Movie. Of course, if you have another default application for editing image files or viewing videos, Cheese will defer to it on a double-click.
Basic file management could not be simpler in Cheese. Photos and videos taken with Cheese remain in the library strip at the bottom of the app window. To save a photo or video outside of the Cheese storage area, right click it and select Save As. Two other file functions are done the same way.
For instance, you can open the selected movie frame photo image with a right click. You can move it to trash or delete it the same way.
Bottom Line
Cheese is close to being the ideal webcam studio app. It is not pre-installed in every Linux distro. But it is easy to get and install.
You can use Cheese intuitively with good results. It lacks nothing that would deter you from using it as your default webcam tool. If its developers added more special effects, Cheese would be even more indispensable.



















The default format for video output is Theora, (last time I used it) which is not a youtube supported fromat.